Tuesday 29 August 2017

Watercolour Sea Creatures

Hi everyone! Tonight I am showing off some colourful holiday nails, which double up as my first ever Sharpie manicure. I wore this nail art while on a week away with my boyfriend and his family, so I associate it with fond memories!

This was my first manicure using sharpies, so I decided to experiment a bit. On one hand (top two pictures) I coloured relatively neatly within the lines, and on the other I went for a bit more of a splashed watercolour look.

I started with an off white base (colours listed below the pictures), and then stamped some images onto my nails from my Mo You London Animal 01 plate, and once dry applied a quick dry top coat. For the colours I scribbled a bit of each sharpie colour onto some foil, and mixed it with a little polish remover on a small nail art brush. I then dabbed it onto my nails within the images. I had to work quite fast as the sharpie ink dries quickly, even once mixed with polish remover. Once it was all dry I applied a matte top coat.

I think I like the neat hand best, but the messy one has a certain charm too, what do you think?
Colours used: Midnight Mischief - Painted Polish, Colour Burst Sharpies

Friday 25 August 2017

Decal making - butterflies

Hi everyone! Got some advanced stamping/decals to show you today. This technique has become one of my post used, as I'm not so good at freehand! This particular design is not one of my favourites, the pink isn't really my usual sort of shade. Also the butterflies are too small for my nails, and I can't quite decide whether that looks good or not! I will need to learn/practise stretching images.
I took the above pictures for a competition on Instagram by Mo You London, but due to a holiday didn't manage to get it in on time! Although I wasn't too sure about the design itself I do love the pictures of the decals looking through clear stampers.

For a base colour I used a pale pink (colours listed below images), and put a layer of shimmering holographic pink from ILNP's spring 2017 collection. For the butterflies I used a few more shades from ILNP's spring collection to get some lovely sparkle. Being from the same collection  the colours work well together. You can see how I made the decals here.
Colours used: Surfboard - Barry M, Ballet Slipper - ILNP, Midnight Mischief - Painted Polish, Bermuda Breeze - ILNP, High Tide - ILNP, Versailles - ILNP, Yours Truly - ILNP

Sunday 20 August 2017

Guest Nails - Summer Prints

Hi everyone! Guest nails again tonight. These are some I did for my friend Jess as she was going to a wedding. Please excuse the mess around the edges, I find it harder to do clean up on other peoples nails! Plus with both agree it's actually pretty satisfying getting the mess round the edges off in warm water!

We started with a pale pink base, and stamped a few images in white from my Doodles 01 plate from Mo You London. For a few other images I created decals and added a pit of a darker pink in some of the patterns. I used my Uber Mat for these, you can see how here. For the accent nail I used the lovely rose gold Halcyon from Cirque Colors. I really liked these, I like how her nails are small enough for the whole doodles designs to fit, and I think it's very fitting for a summer wedding :)
Colours used: Surfboard - Barry M, White Knight - Mo You London, Acai Smoothie - Barry M, Halcyon - Cirque Colors

Thursday 17 August 2017

Marble/ Stone Effect Nails

Hi nail people! I'm on holiday this week so feeling super relaxed and finally finding a bit of time to catch up on some blogging! This was one of my more 'grown-up' looks and took a little time to grow on me, but I was mostly pleased with the end result. I've seen a number of techniques on creating  marble like nails and the free hand options appealed the most (for once!).

I started with a white base and then a layer of top coat to protect the base. I then used a small nail at brush to paint some small lines in random places across each nail. I then dipped the brush in  nail polish remover and used it to blur the lines across the nail. Once done I used the same dark grey I used for the initial lines to do a few more over the top, using some images online as a guide.

My intention was to use stencils or tape for the next bit but that would have taken a long time to allow everything to dry. I painted on some gold at the bottom of each nail and then applied another top coat, as I wanted to get a smooth and slightly sticky finish for the next step. When the top coat was nearly dry I used gold chrome powder over the gold polish. I then used a water based to coat to finish the gold, and a matte top coat for the rest.

Strangely the gold looked mirror chrome to start with, but didn't last even long enough for my pictures (taken the next morning for better light).It did stay super shiny though. I wonder if it would have worked better over black. Overall I am quite pleased with this design but think it could get better with practise. I'd like to try it with some other colours, particularly turquoise.
Colours used: Alpine Snow - OPI, Dragster - Barry M, Gold Digger - Barry M, Gold Chrome Powder - eBay

Monday 7 August 2017

Disco Rainbow! (Inspired by So Hot Right Nail)

Hello nail world! Today I'm showing you my attempt at disco rainbow nails, as seen on the Instagram and Youtube accounts of So Hot Right Nail. Annoyingly I've noticed a bit of clean up I missed in the first couple of pictures, so please don't notice it! I couldn't take another picture later on as there was some damage, which I will go on to explain a little later.

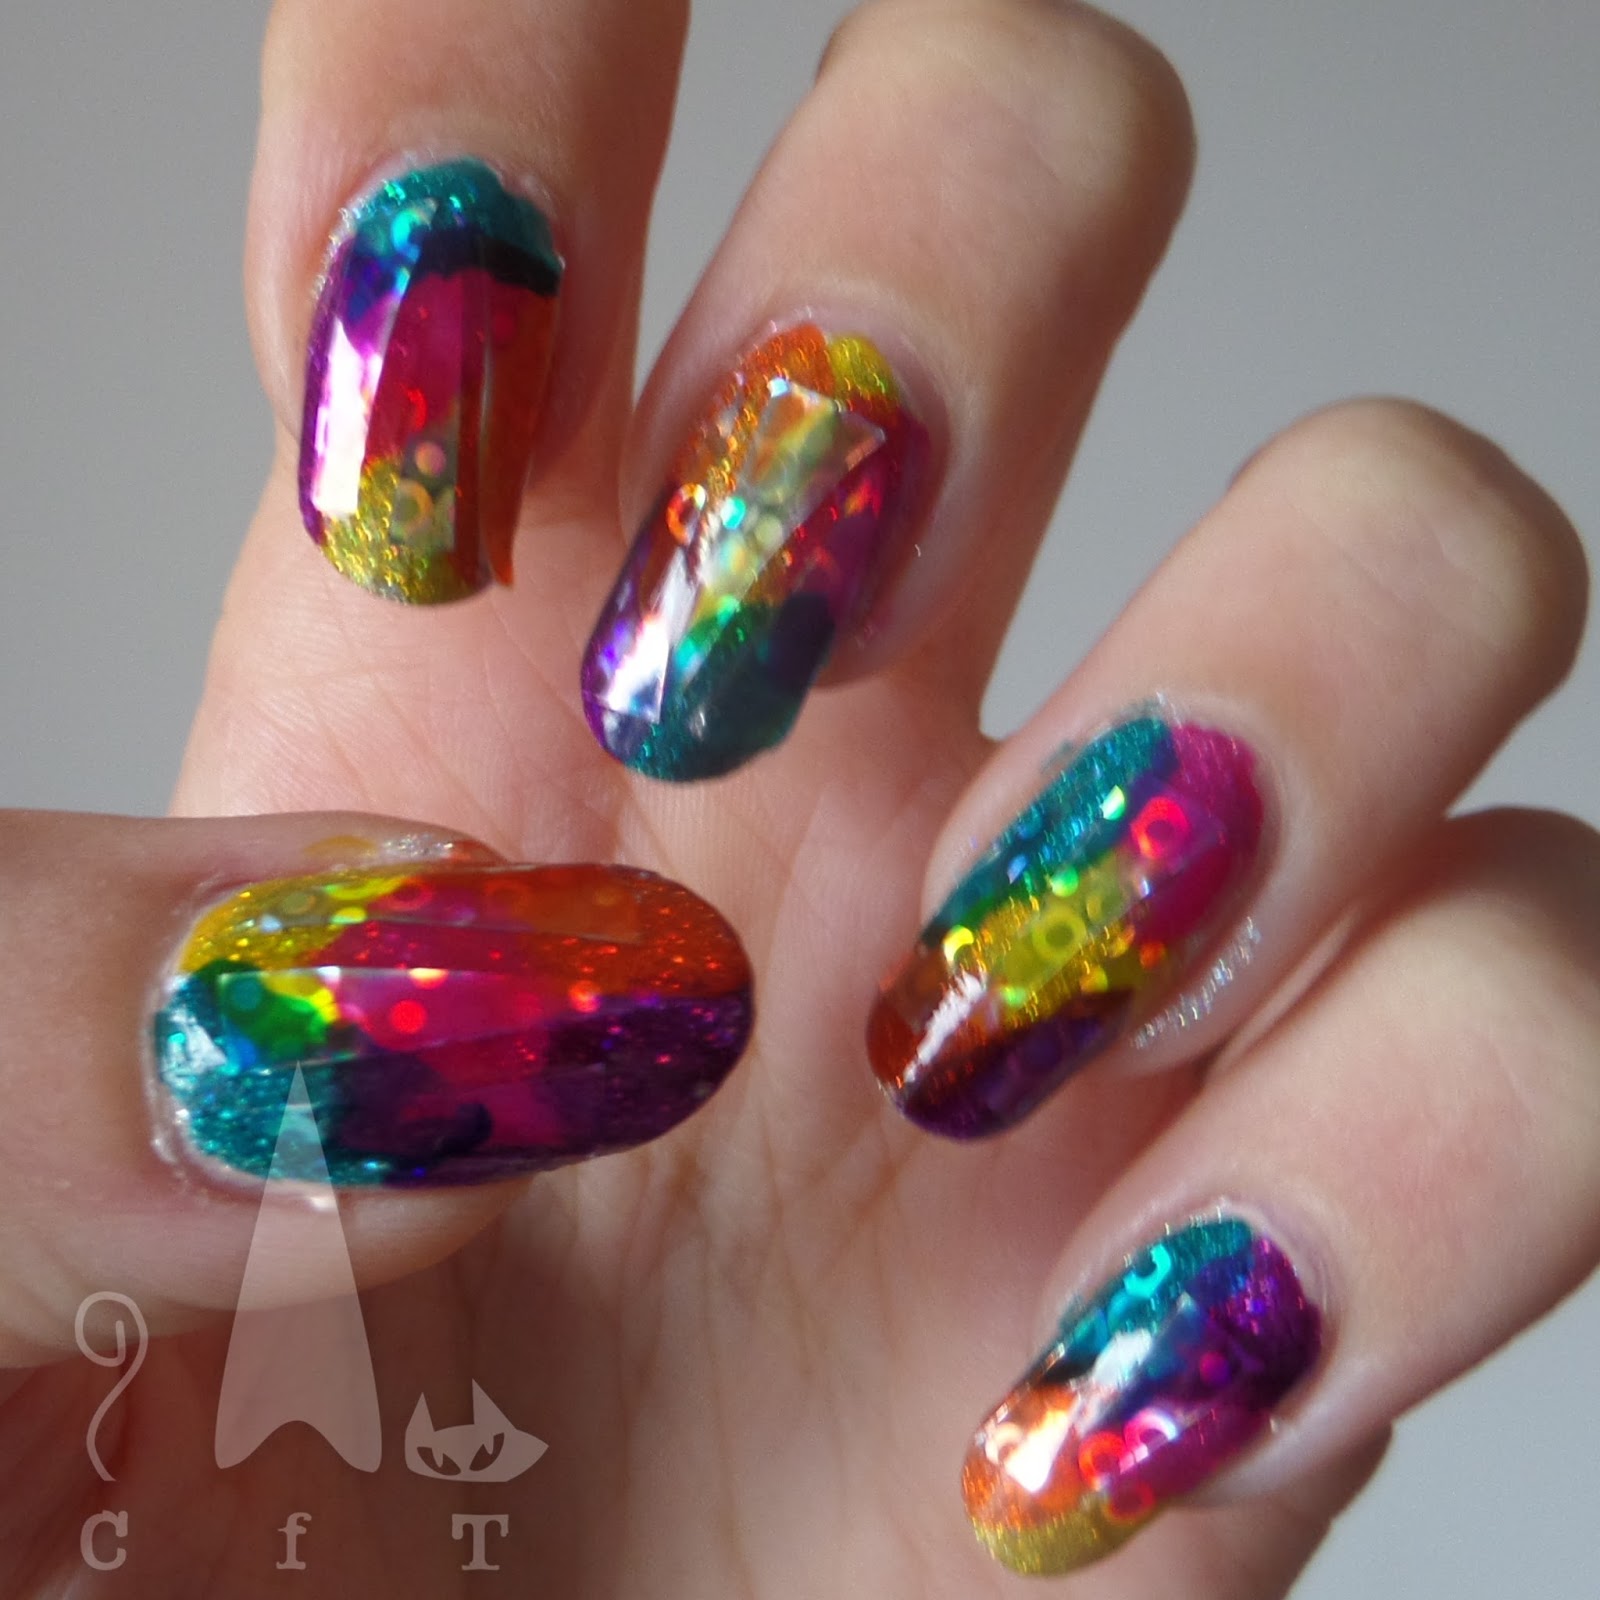
So I started with a peal off base coat, and then a layer of silver holographic glitter polish (the ones I used are listed below the pictures). I then added a thin layer of a different holo polish to add some dimension, and because it is an even sparklier one! Next I cut some shiny holographic nail foil (bought cheap on eBay) into thin triangular pieces. I added some clear polish to my nails and used tweezers to place three triangles on each nail.

Those of you who have tried a similar technique in the past will have noticed that I missed something! I was meant to remove the clear layer from the nail foils before placing them. I completely forgot this which meant a few of them flaked off over the next few days taking the colour with them. I will definitely being doing similar designs again so at least there is a lesson there!

Finally I used some OPI Color Paints and painted them over the top in just one layer so the holo goodness shined through. I loved the final effect so it's a shame it didn't last longer!
Colours used: Cosmic Girl - Danglefoot Polish, 24 Karat Diamond - Fun Lacquer, Primarily Yellow - OPI, Chromatic Orange - OPI, Pen & Pink - OPI, Purple Perspective - OPI, Turquoise Aesthetic - OPI

And finally, a picture of just the silver, as it was soo shiny, and  a picture which didn't  quite come out right, but I just had to share how it looked with my bright pink Comforter shower gel from Lush!