Monday 27 February 2017

The Great Nail Varnish Blob! (or nail free polish mountain?)

Have you ever wondered what it would look like if you poured out a big pile of nail polish onto your nail mat? Nope? We I am here to show you anyway! :D

Not posting any nail art pictures today. This one is definitely just for people who are bored... So I had a bottle of CND Vinylux top coat that I got back when Nailbox was a thing. The topcoat itself was rather good, dried quickly, super shiny and long lasting, but unfortunately as it neared the end of the bottle it went quite thick and stringy. and became increasingly difficult to use.

So after another difficult manicure trying to layer it up, I thought I may as well tip out the last little bit. There was quite a bit more than I thought! I tipped it onto my nail Uber Mat and watched it slowly spread out into this sort of cartoon ghost shape. The two pictures below are in different lighting. It was so shiny, and so tempting to poke, especially as it started to dry!
After leaving it on the mat for probably close to 24 hours, I peeled it off, which was sooo satisfying! It had quite a strong smell and was smooth and pliable. I left my little ghost creature on my desk as I couldn't bring myself to throw it out and a couple of days later it looked like the below, thinner and curved inwards at the edges. It's surprising how strong it is! It still smells quite strong too, it reminds me of the clear plastic swimming bags I used to have as a child. Maybe I could make a bag out of nail polish...
So there you have it... my most random blog post yet! I haven't got rid of my little plastic nail polish ghost/blob yet!

Wednesday 22 February 2017

Mo You Scandi Plates & Cirque Idyllic

Hi everyone! Got a slightly picture heavy blog post tonight, I just couldn't choose which ones to use! I've gone for the design first, and then some pictures of the base colour (Idyllic - Cirque Colors) which I purchased recently from Rainbow Connection, a polish comparison and a picture of my new clear rectangular stamper.

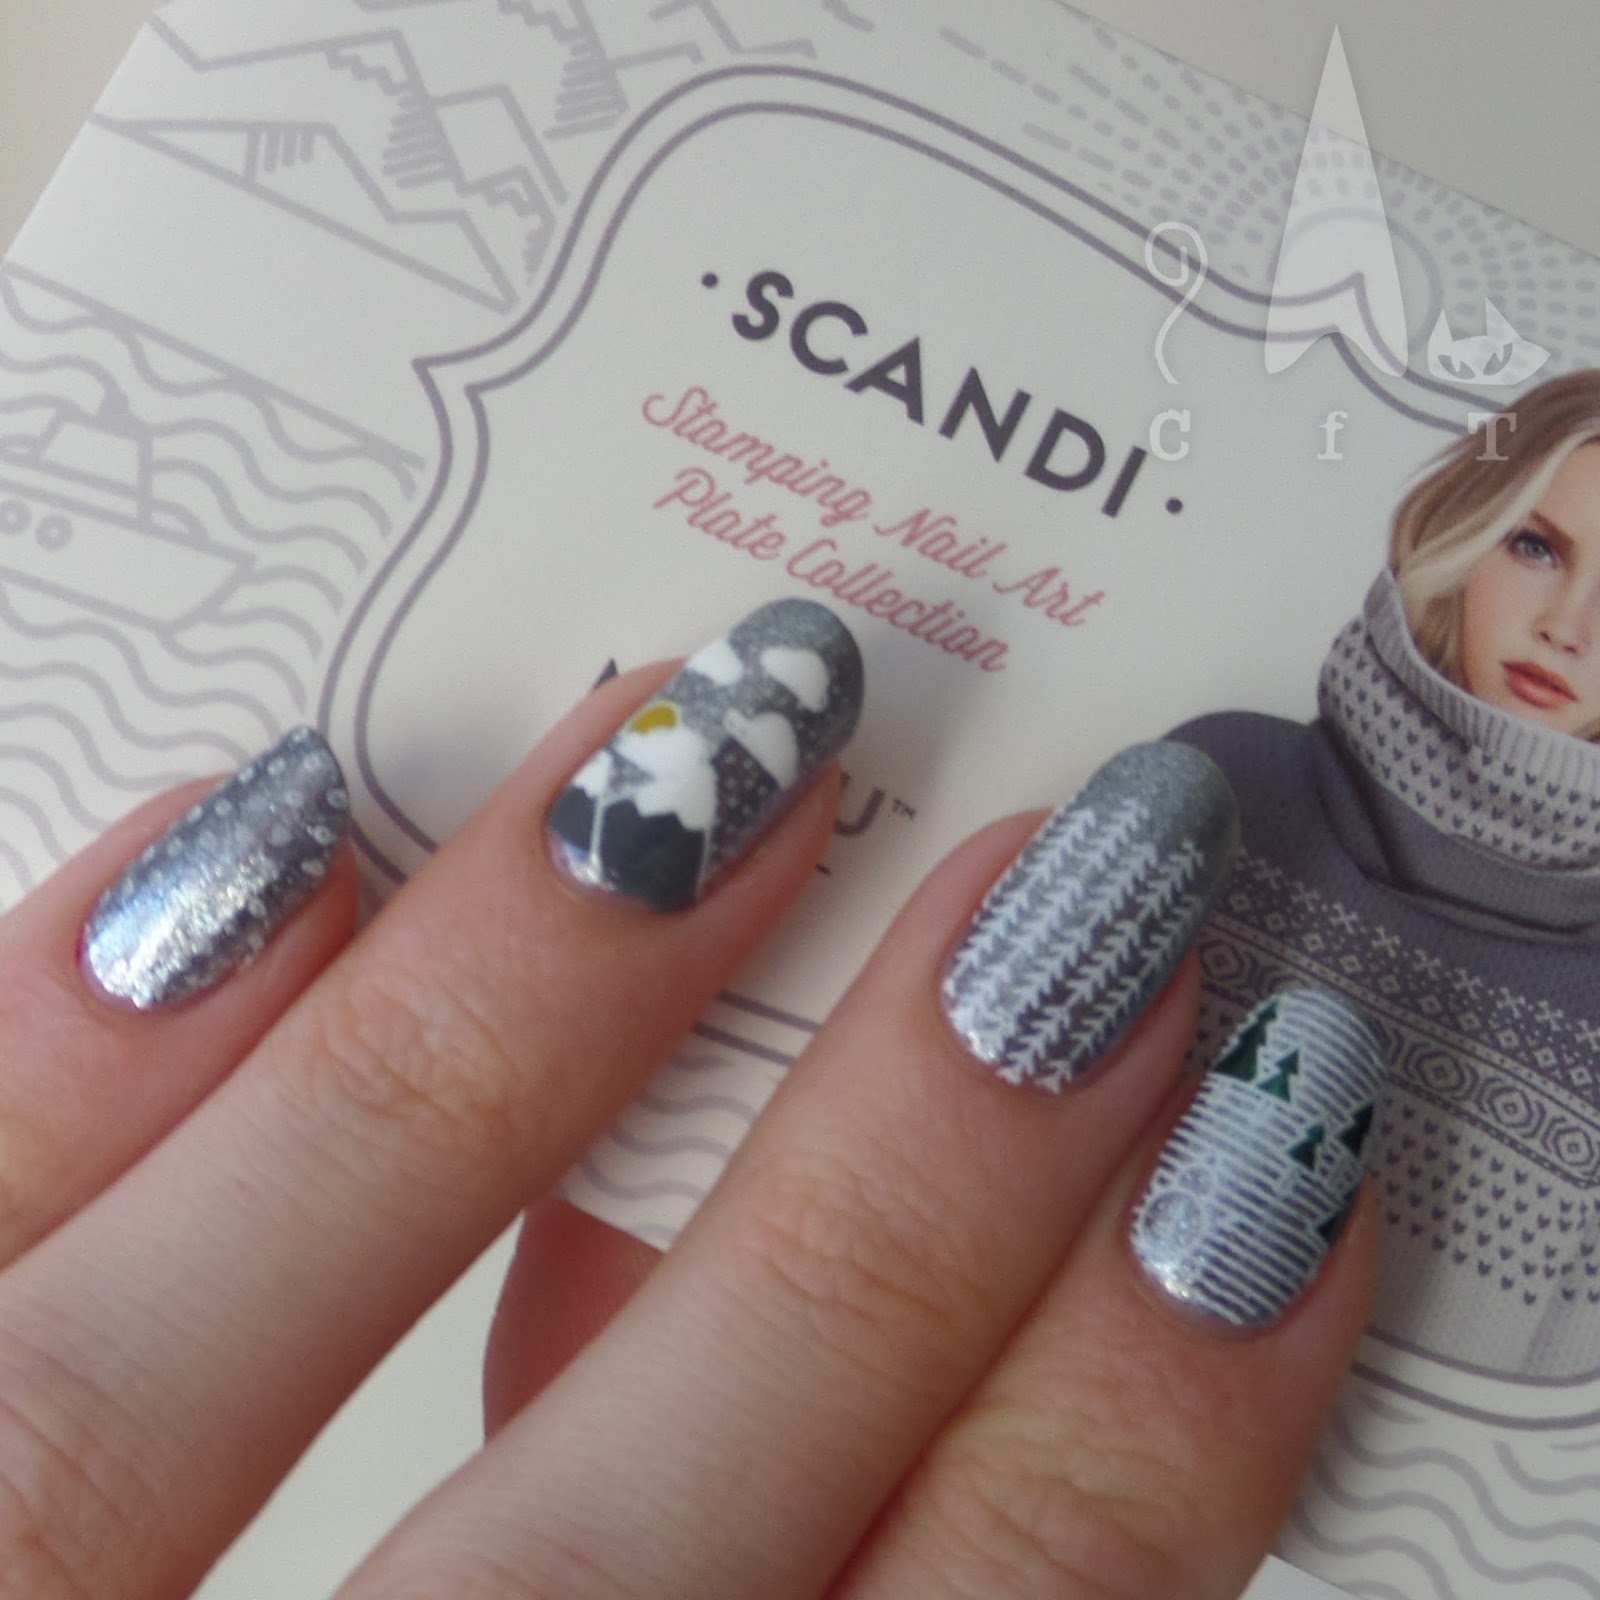
I used the advanced stamping technique with my Uber Mat to create this design. You can see instructions on how to do this here. I was super excited to try a couple of the new Scandi plates from Mo You London. I didn't really need any more but I couldn't resist as they're so versatile. This design uses plates 01 and 03. I also picked up their rectangular clear stamper. Again, definitely didn't need one! I was just so tempted as I've never used a rectangular stamper before and it's the first clear one I've seen (picture at the bottom).
Colours used: Idyllic - Cirque Colors, White Knight - Mo You London, Grey - Barry M, British Racing Green - Butter London, Blueberry - Barry M, Yellow - Barry M, Dead Heat - Barry M

The below two pictures are of Cirque Colors Idyllic. This is the sister polish of their popular 'Halcyon' and has just as much beautiful flaky shine! I hadn't been tempted when I originally ordered Halycon but then I saw it on Simply Nailogical's Youtube channel and was swayed! It's a little more silver than I expected, but the ice blue colour does show up in some light.
I needed to know once I saw how silver it was that Idyllic wasn't too similar to Barry M's Silver Lining from their molten metals collection. I tested them both out on my Uber Mat and was pleased with the difference! I thought the molten ,metals were shiny so I was really impressed to see that Idyllic is significantly more shiny!

On the right is one of the images on the new stamper. There is something so satisfying about pictures of stampers in action, is it just me? The stamper was smaller than I expected, and pretty much exactly the right size for my nails, so I think it will be good for smaller images.

Friday 17 February 2017

Moles In Love

Hi all! Here is my belated valentines nail art. I've been ill with a fluey type think so haven't had the chance to post this yet. I'm not that big on valentines nail art as it's a bit too pink and fluffy for me, but I usually do the one obligatory design per year! Last years lobster design is my favourite so far, you can see it here.

This year I decided to go for something rather random but cute. I was winding up my boyfriend by going on and on about an adorable baby mole, and the idea for doing mole nails for valentines came into my head. After all, when you've been together a few years and live together, winding each other up is a huge (and fun :P) part of a relationship!

I used CBL's Party In Rio for three nails on each hand. it's perfect for valentines day as it's a red polish with red glitter and hints of pink. It's a shame the pictures don't quite show up the glitter, it's lovely and three dimensional. For the accent nails I went freehand for a change and made some decals on my Uber Mat using nail polish. I made two different styles so I could see which I liked best but actually rather liked both so I used my thumb nails as accent nails as well. On my fingers are little round moles holding heart shapes, and on my thumbs are little moles peeking out of their holes. My freehand could use improvement but I do think these are rather cute!
Colours used: Party In Rio - Colors by Llarowe, Cream Soda - Barry M, Smoky Quartz - Cirque Colors, Basil Street - Nails Inc, New York Noir - Nails Inc

Sunday 12 February 2017

Stamping Sunday: Animal Galaxy

Today's stamping Sunday design is super sparkly thanks to a recent order of Fun Lacquer polishes from Rainbow Connection. I accidentally ordered two bottles of Galaxy (doh!) and am still deciding what to do with the second, so to me it made sense to use that one first. Galaxy is a gorgeous purple holo glitter I've had my eye on for some time. I used it over a nude coloured peel off base coat so it probably looks slightly lighter than usual in these pictures. I look forward to seeing what it's like over black.

Below is a somewhat fuzzy picture of Galaxy sponged over the nude base (I was trying to capture the sparkle!). Beside that is my 'sparkly underwear', my gold flaky base coat from Elegant Touch's Nail Apothecary. I thought I may as well go all out with the glitter!
I sponged the glitter polish onto my nails to get a smooth full coverage. I don't really like using that technique as it's so messy (my cuticle guard was failing!) and less fun than just painting it on, but I do admit that it does give smooth coverage without it feeling like my nails are weighed down with glitter!

For the design I used Mo You London's Hipster 15 stamping plate and my Uber Mat to create decals to stick onto my nails. You can see a picture tutorial of how to do it here. The colours used are below the pictures. I decided to try top coating this design with a gel top coat to get a really smooth shiny finish, as I already had a peel off base coat on. I don't think anything could have made the holo glitter any more shiny but it certainly smoothed it out!
 
Colours used: Galaxy - Fun Lacquer, Black Knight - Mo You London, Grey - Barry M, Blueberry - Barry M, White Knight - Mo You London

Below is the design in bright artificial light (in TK Maxx!) as it glitters the most under bright lights. It glitters well in the sun too but we don't have much at the moment so I have no pictures of that! One day I will find a better way to capture the glitter in my pictures at home!

Monday 6 February 2017

Adventures In Gel Polish

The Christmas just gone I asked for a gel lamp, as I was keen to see what it was like after discovering the joy of peel off base coats! I'm by no means converting entirely to gel, but I know it offers some advantages, like super shiny nails! I was also curious to see how it all works, and to try chrome nails with gel as it makes a smooth base.

Tonight I'm showing you my first attempt! To the left are the things I used on my much loved 'nail station'. OK perhaps I didn't 'use' the pineapple lamp for this, but it had to
be included!

So I started off with a peel off base coat so that I
could easily remove the gel. The peel off base
works well with thick polishes like gels or
glitters.

I used the Dance Legend peel off base
coat in nude.

The other items I used (shown above) were a gel lamp, gel polish and top coat, small 'gems' and a soft pencil for picking up the gems (from eBay).

I purchased a few cheap gels just to try them out, the colours I bought are from FairyGlo and the top coat is BlueSky.


One of the things I like about the gel/polish/peel off base combo is that if I'm peeling it off anyway I may as well stick things on it! So I decided to try adding gems on top of the gel. Below are some pictures of the result. I was so impressed with how shiny it was! I have some very shiny nail polishes but this really was incredibly shiny! I could see my reflection! You can see some trees outside the window on my thumb nails in the pictures below!

These didn't last long as I couldn't resist peeling them off (very unlike me!). I've included some pointers below the pictures about what I learnt.

  • Use thin layers of gel - you want enough  polish to evenly cover the nail, but not too much as this can cause it to pool at the edges, and once it's cured it can't be undone! Because the polish doesn't dry until it's cured in the lamp you can always add a little more if there isn't enough on the brush.
  • Stick on gems using tiny specs of polish - I placed the gems over a layer of gel polish, which because the layer hadn't tried ended up pushing it into the edges. Using small blobs would mean there isn't enough for it to pool into the edges of your nail.
  • Cure your thumb nails separately - This probably depends how much polish you've used, but I found if I put my whole hand in the gel lamp the gel on my thumb nail shifted to the side a bit as my thumb was on it's side.

Sunday 5 February 2017

Stamping Sunday: Classic Geometric Style Manicure

Good evening nail world! I've got a simple advanced stamping design to show you today, but one I rather liked. I haven't blogged for a week as I've been away in Krakow on business, and these were the nails I did for the trip. I wanted something grown up, as my travel was for work, but still wanted a bit of nail art. I also went for blue glitter and marine images last time, so wanted something more classic this time!

For my main colour I used Garnet from Cirque Colors, a beautiful deep red with tiny shimmery flakes of glitter. It's from their Facets Collection which I adore! You can see my initial thoughts of the collection here. For the accent nail I used my new Holy Shapes 03 plate from  Mo You London, and used the advanced stamping technique to colour in some of the spaces in the image with beautiful shiny rose gold. Click here for a picture tutorial on advanced stamping using a stamping mat, and here for how to do this with no stamping mat.

I hope you've enjoyed this design, I certainly intend to use these images with more of the Facets Collection so stay tuned!
Colours used: Garnet - Cirque Colors, Alpine Snow - OPI, Black Knight - Mo You London, Halcyon - Cirque Colors