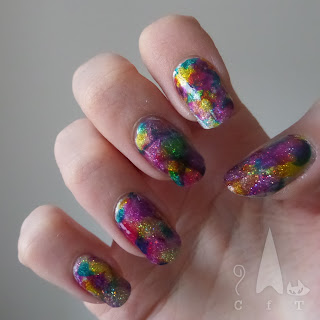
Sunday 29 January 2017

Stamping Sunday: Whales & Penguins

Happy Sunday! Today I have another stamping design, nothing fancy but certainly very seasonal. I haven't used Topshops matte metallic polishes for ages, I got them a couple of years ago and very much fell in love with them, but of course I've fallen in love with many other polishes since then and they've got a little left behind! This blue is called Virtuous and I think it's a lovely elegant wintery shade. I decided of course to take away some of the elegance but adding little blubbery arctic creatures!

I used the penguin and killer whale images from Mo You London's Animal 04 stamping plate for the accent nail, and then used a small nail art brush to paint a small semi-circle using black matte metallic polish Scream. I liked the effect of this but it was actually only done because it was a necessity. My nails have got a little long for Mo You's smaller images at the moment so there was a gap underneath the images.

I'm off to Krakow in Poland with work till Thursday evening, so will probably be back with my design for Krakow on Friday. Have a good week!
Colours used: Virtuous - Topshop, Alpine Snow - OPI, Black Knight - Mo You London, Scream - Topshop

Saturday 28 January 2017

Lollipop Lava Lamp Nails

Hi everyone! I'm back with another bright January manicure. This was an experimental one and while it was fun it didn't quite turn out as I would have liked. I've had two of Barry M's lolly gloss polishes sat in my collection for months and months, somehow never getting round to using them. I'm a big fan of OPI's colour paints and a sheer blue polish I have, so I knew I'd enjoy using these sheer polishes too.

I started with two layers of polish on each nail, and then used a nail art brush to paint on some blobs based on pictures of lava lamps. I got one for Christmas when I was about nine, and it still works! Admittedly I rarely use it but I do rather like it. One dry I painted another coat of sheer polish over each nail. This blended the colours a bit which I think is where it went wrong, the colours bright jelly like look is great for lava lamps, but I think the 'lava' needed to be in a more contrasting colour.

Finally, I used silver polish at the top and bottom of each nail to give them  a rocket lava lamp look. One other thing to mention about these 'lolly gloss' polishes is that they are scented! I certainly wouldn't choose a nail polish just because it's scented but it's a fun novelty. Initially the smell was quite sickly sweet, but once the nail polish element of the smell faded away about it was quite good, I think it smelt like fruit squash.
Colours used: Purple Drop - Barry M, Cherry Drop - Barry M, Soho Silver - Nails Inc

Sunday 22 January 2017

Stamping Sunday: Shimmering Aquatics

Happy Sunday everyone! I am sooo sad that the weekend is almost over! On the plus side I have some shimmery aquatic themed nail art to show you. I rather liked this design, the colours and images are very typically the sort of thing I go for. I started with a purple metallic base on three of my fingers (colours listed below pictures), and a shimmery off white/very pale grey on my thumb and ringer fingers. I used Mo You London's Animal 01 stamping plate and Barry M silver foil polish to create the initial images. I used the advanced stamping technique and my Uber Mat. You can see a tutorial on how here.

I liked my right hand best as the fish was more detailed and the octopus looked like it was running towards something! The Jessica polishes are a gift from my boyfriend. Each year for Christmas he gets me a new one, it's become a bot of a tradition. This time I got two (one was the purple and the other some holo bar glitter) so I can't wait to try out the second!
Colours used: Prima Donna - Jessica Nail Polish, Lakodom - Picture Polish, Indigo Glow - Jessica Nail Polish, Silver Foil Effect - Barry M, Casablanca - Jessica Nail Polish

Just had to add a couple of detailed shots of the thumbs as I think these were my favourite par of the mani, they are so cute, especially the one on the right!
And finally... here is a bonus picture of my nails pre-stamping, and my work space. I had re-shaped them before this design so was enjoying seeing the new colour on my 'new' nails!

Wednesday 18 January 2017

Rainbow Oil Slick

Hello nail people! Today I'm recreating a look I've seen around on Instagram a fair bit and couldn't resist trying. The first version I saw was a 'unicorn oil slick' and had more pastely colours. I used my OPI Color Paints for a brighter look. The finished product was less unicorn like so it is a rainbow oil slick!

This design was good fun and easy to do. I started with a silver base, and the added some glitter. I used two different silver glitters. Cosmic Girl from Danglefoot Polish gave a lovely twinkly and somewhat holographic look, and then I added some Diamond Glitter from Barry M for some larger glitter pieces and extra sparkle.

I googled Unicorn Oil Slick and came across a handy video from Nails by Jema. I enjoyed watching the video for tips. I knew how I was going to do the nails but wanted to check out my options! I decided to change my original plan of smooshing the colours onto my nails with a stamper, and followed Jema's advice of using my Uber Mat to create decals instead. This meant I could create more than I needed, and select only the best ones to use. I'm glad I did that as some of the ones on my mat weren't as good as I'd have liked. The ones on my nails were the most multi coloured, still ended up with one very pink little finger though!
Colours used: Silver Canvas Undercoat - OPI, Cosmic Girl - Danglefoot Polish, Diamond Glitter - Barry M, Primarily Yellow - OPI, Pen & Pink - OPI, Purple Perspective - OPI, Turquoise Asthetic

Saturday 14 January 2017

Advanced/reverse stamping with stamping mat - In pictures

As promised (though a little later than intended - work is manic) here is my picture tutorial for advanced/reverse stamping using a stamping mat. My mat of choice is the Uber Mat from UberChic nails. I'm already looking back at the last tutorial and thinking the end result wasn't as good as usual, which isn't great for a tutorial! Perhaps I will add to the many video tutorials and link back to those in my blog instead. So, let's begin!

You will need:

  • A stamping mat
  • Stamping plate
  • Stamper and scraper
  • Stamping polish/highly pigmented polish
  • More polish for filling in your design
  • Clear nail polish
  • Dotting tool or small brush
  • Nail polish remover
  • Cotton pads
  • Top coat
  • Cotton buds of clean up brush


Step One:

Paint some clear polish onto the stamping mat where you would like to create your decals/images. 

This is necessary to give the image something to adhere to, If you don't to this step it is likely that the image just won't come off the stamper onto the mat.

Tip: Use a normal clear polish and not a quick dry top coat. Quick dry top coats will dry too fast and make the image lift when you're trying to work on it, or go crispy.


Step Two:

Cover the image you'd like to use in your stamping polish, and scrape off the excess as shown.

Promptly after this, press the stamper down onto the image and lift, so the image is picked up onto the stamper.


Step Three:

Roll the stamper over the clear polish on your stamping mat (once the clear polish is dry - this shouldn't take long).

Tip: It may be useful to put a piece of paper under your mat, or place the mat over a while surface so you can see the fine details of the image a little better.


Step Four:

Leave the image a few minutes to dry, and then start colouring in with your dotting tool or brush, directly onto the mat.

Use a a dabbing/dotting motion rather than dragging as using normal brush strokes can drag away part of the image

The side you cane see while you do this is the side that will be placed onto your nail, so don't worry if you cover some of the lines, just try not to go outside of them!


Step Five:

Fill in your image and allow 5-10 minutes to dry. You can test it by touching it very lightly.

Once dry apply another clear layer over the top, and allow another 10-15 minutes to dry. I find this is a good time to apply your base colour.


Step Six:

Once the clear coat is dry bend the mat a little, close to one of the images, so that the edge starts to lift.

Use some tweezers (or a long fingernail!) to take hold of the edge, and gently pull the image away from the mat.


Step Seven:

Hold the decal gently with one hand/your tweezers, and use nail scissors to trim the excess from around the image.

The less excess the better, as this will make clean up and application easier!


Step Eight:

Place the image gently on your nail, with the side that was facing up on your mat, facing down on your nail. It will look kind of matte at first, but not once it has a top coat!

Life the edges to trim off any further excess with nail scissors.


Step Nine:

Press the image down, starting in the middle and pushing outwards towards the edges.

Use a cotton bud, or clean up brush dipped in nail polish remover/acetone to clean around the edges and seal the edges of the decal down if necessary.


Step 10:

Apply a top coat over the entire nail and allow to dry (fine to use a quick dry one this time!).

I love this step as it really melts the image into the nail and makes it look like it was painted on directly.


Voila! I tend to use my Uber Mat as by preferred tool for advanced/reverse stamping as you can do so many images at once. I often create a few more decals than I need so I can pick the best ones to go on my actual nails. Thanks for reading!


Sunday 8 January 2017

Stamping Sunday: Reptiles Everywhere!

Good evening all! It's cold and wet outside, and work is absolute misery at the moment, so I've been going for bright nails, or nails that remind me of hot weather! Wasn't actually intentional but it seems to be becoming a theme! So I got three lovely new stamping plates from my boyfriend for Christmas, from Mo You London's new animal plate collection. The first I've tried out is the Animal Plate 10, which as you can see has a reptile theme.

I used an off white base (colours used listed below the pictures), and then green stamping polish to create decals using my Uber Mat, colouring them in with green brown and yellow. You can see my picture tutorial on reverse stamping here, I used this design to create a similar tutorial for reverse stamping using a stamping mat so that will follow shortly. Watch this space for more animal themed nail art!
Colours used: Cream Soda - Barry M, Ever Green - Mo You London, Seven Dials - Nails Inc, Key Lime - Barry M, Cocoa - Barry M

Monday 2 January 2017

How to do advanced/reverse stamping - In pictures

Hi there! Today I'm showing you how to do advanced/ reverse stamping in pictures. I use this technique a lot (both the original way and using an Uber Mat - tutorial on that to follow), so thought it would be good to have a guide to refer back to so my blog posts make more sense! All the stamping tools I've used are from Mo You London.

You will need:
  • A mat or kitchen roll to cover the surface you are working on
  • A stamping plate
  • Stamper
  • Scraper
  • Stamping polish
  • Colours for filling in your design
  • Dotting tool or small brush
  • Clear nail polish
  • Top coat


Step One:

Cover the image you would like to use with stamping polish. Alternatively you can add a thick line of polish at the top of the image and drag it across the image when you use the scraper (step two).


Step Two:

Holding your scraper at an angle (as shown), scrape of the excess nail polish so that it only fills the image and not the surrounding area.


Step Three:

Pick up the image with your stamper, pressing down firmly so that all of the image is picked up, but not hard.
If bits of other images, or bits of the image you don't want have picked up as well, you can use sticky tape to gently remove them from the stamper.


Step Four:

Leave the image a few minutes to dry, and then start colouring in with your dotting tool or brush, directly onto the stamper.
Use a dabbing/dotting motion rather than dragging as using normal brush strokes can drag away parts of the image.

The side you can see while you do this is the side that will be placed onto your nail, so don't worry if you cover some of the lines, just try not to go outside of them!


Step Five:

Fill in all of your design and allow 10-15 minutes to dry. I'd usually use this time to apply my base colour.


Step Six:

If you have used a dark base colour and want your image to stand out, colour the image in again using white polish and allow to try. If you've used a lighter base colour you can skip this.

Once all colouring in is dry apply some clear polish over and closely around the design. Do not use a quick dry top coat for this as it will dry to quickly and make the image go hard and crispy.


Step Seven:

There are two ways you can do this:

1) Roll the image directly onto your nail using the stamper. It's fine if your clear coat is still slightly sticky for this as it will help it stick to the nail.

2) For more precision of where you are placing the image, you can peel it off the stamper using tweezers (or long nails!), trim the edges (if necessary) and place it onto your nail, pressing the edges down with your fingers.


Step Eight:

Trim the edges further if required, and press the image down to make sure there are no lumps or bubbles. I find pushing from the middle outwards works best.

Once you have done that apply a top coat (fine to use a quick dry one this time!). I love this step as it really melts the image in to the nail and makes it look like it was painted directly onto your nail.


Ta da! I feel like this is a slightly messy example, but I suppose I am still learning too! I usually use my Uber Mat to make decals now, and will post a picture tutorial on that in the near future.

I find this technique is good for small images, like the origami dragon I used for this example. It can be used for images that cover the whole nail too, but I personally find a mat easier for those.

Thanks for reading!

Sunday 1 January 2017

Happy New Year!
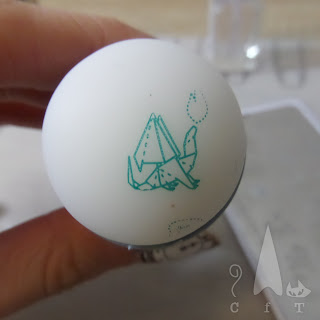
Happy new year! Today I of course have new year nail art (pictures below and polished used at the bottom of this post). As part of a Secret Santa I was given a new year stamping plate from Mo You London (Festive 05) so I was excited to try that out. I knew I was going to use my peachy champagne coloured glitter/shimmer polish for this design as it's just perfect for the theme! I also used black and white as I thought they'd work well with the designs, and compliment the champagne colour best.

I used the advance stamping technique for this design, using by Uber Mat to make decals our of nail polish for all nails except the firework ones which I stamped directly onto the nail. The only exception was the 2017 nail which I painted using a small nail art brush and black nail polish. I can't quite decide which my favourite hand is, I particularly like the clock and the champagne glasses. The only downside I had creating this was making the mistake of trying to use a quick dry top coat to make decals. They dried to fast and went hard so it was very tricky to get them to lie flat!
I've made two new years resolutions this year, one of which is a blog resolution. My aim is to improve my nail photography, as I think mine is a bit shabby! So I'll be trying to get familiar with the functions of my camera.

Best wishes for the new year! I hope it is a happy. healthy and productive one.
Colours used: Morganite - Cirque Colors, Alpine Snow - OPI, Lady In Black - OPI, Black Knight - Mo You London, White Knight - Mo You London